
After doing my Dolphin SCR course in around 1995, I bought one and within a few seconds I started fiddling with it to transform it into a CCR. Since then, I have been modifying the unit and following in-watertime and customising it to suit my needs. After completing over 300+ hours on the rebreather (and using a mountain of sorb) I finally got it how I wanted!
I always wanted a CCR, but at that stage, I didn’t have the money. I wanted a CCR was for all the same reasons everyone wants one – gas saving; absolute silence; less hassles with transporting gas on trips away etc. But also, what a great project?
If you want to learn about rebreathers – my advice is build your own!! I couldn’t think of a better way to spend those grey weather days indoors thinking about how to better the unit!
This is the “MARK III” Widow Maker, so it has taken a few years to get things the way I want them and now I am very pleased with the unit. In 2000, I completed an expedition to dive a 120 meter ocean liner off the NZ coast. I have certainly been putting the unit through its paces averaging depths of 50-80m. Every dive I do is on a rebreather nowadays; except for technical training dives. It just seems right -why wouldn’t you dive rebreathers?
|
This is my unit viewed from the front. I use a diverite Transpac attached to the backplate. On the unit’s right, is the manual O2 feed, O2 pressure gauge and PPO2 gauges & computers. On the left, is the gas switching block and manual diluent feed. To reduce the clutter I have sheathed the hoses. I use three separate sensors, VR3 Mark1 ( remember the old brick???) , Uwatec Oxy 2 and the Drager Oxygauge. |
|
|
Unit viewed from behind. |
|
|
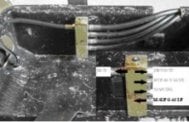
On the exiting point of the scrubber I also had a fitting machined to monitor O2 in the loop. There are two bayonet fitting (standard Drager female fittings) for independent sensors. I have 1 x Drager oxygauge and 1 x VR3 live feed that are attached here. Sensors: Top Drager oxygauge. Below Special drager fitting machined by Dave Sutton for VR3 |
|
|
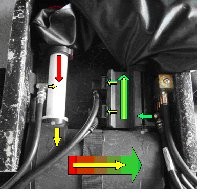
Here O2 is injected into the exhalation side of the loop. All the parts have been machined from Delron. I used 90 degree Poseidon attachments with quick disconnect fittings which make things more easy when filling and assembling the scrubber. |
|
|
Note the manual DIL feed input hole directly opposite one of the sensors. This is to check sensors are working properly. |
|
|
Oxy2 placed in the normal position. |
|
|
The inside of the case. Main Low Pressure block. Here (shown on left) main dilunet feed comes into the unit. From here hoses feed the BC, Bypas valve, manual diluent feed, and drysuit (if not on Mix). |
|
|
Gas switching Block. Also shown here is the manual diluent feed. Note that it is different from the O2. |
|
There are no worries with supply of gas through the LP inflator, seeing that the only gas needed, is to equalise the bag not constantly supply gas at depth. The attachment it a standard LPI. |
|
|
The manual O2 feed was machined from a basic BC inflator. The fittings are standard 3/8th so can be used with any hoses. ALL hoses on the unit are made from off the shelf LPI inflator hoses so can be easily changed in the field. |
So there you are. The “Widowmaker” Just a word to the wise. Rebuilding your own CCR takes a lot of reading around and don’t be fooled, these things can kill you. So if you are game, do your homework first or it will live up to its name!!!!! I now have a buddy Inspiration CCR and love every second on the unit; I still miss the widowmaker though!!!